Saturday, September 27, 2008

Change Root MySQL Password

For this step we will use the GUI MySQL tools. We will use MySQL Administrator.

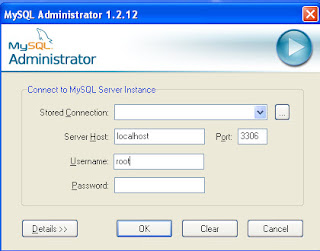
To start using the MySQL Administrator Choose Program Files > MySQL > MySQL Administrator. The MySQL Administrator tool will come up.

You will enter "localhost" for the server name and root for the user name.


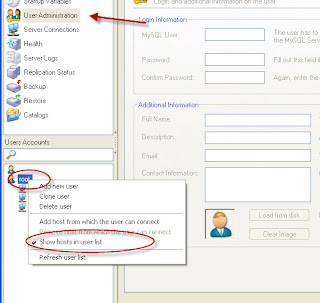
After logging in Choose User Administration.

In the left nav bar you will see the root account, select the root account left click it and choose "Show hosts".


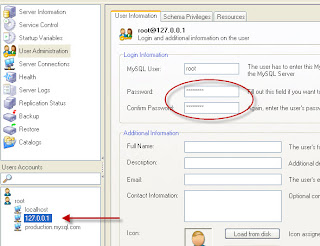
Select the "localhost" or "127.0.0.1" nav under root. Then in the left panel enter your new root password.

Back Up and Change Passwords

So our application should be up and running correctly at this time.
We have a couple more things to do, we need to change the passwords, both for root and the application and then we need to take a back up of the file system and the database and store them in a second location.

Allow External Access

By default WAMP only allows access to the main website from the local host. You will need to edit httpd.conf again to allow access from additional locations.

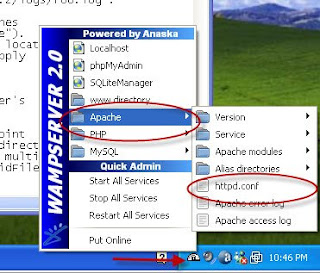
Left click the WAMP icon in the status bar. Choose Apache > httpd.conf.
Find the line which says "Allow from 127.0.0.1" Change this line to "Allow from all"

Edit http.conf for permalinks

Word press has a feature called permalinks which allows you to customize you navigation links to have user-friendly links instead of numeric links. Each post is attached to a numeric number which can be used to access the word press post. If you turn on word press this page id is related to a user-friendly word which can be used instead of the numeric value.

By default WAMP is not configured to work with permalinks. In order to set up your Apache instance to allow permalinks, you must load the mod rewrite module in the Apache configuration file.

This is very simple to configure since Mod rewrite is already loaded in the httpd.conf file it is just commented out.

Step 1. Allow Mod Rewrite.
Left Click the status bar and choose Apache > httpd.conf. This will bring up the file for edit.

Find the line in the file that has "#LoadModule rewrite_module" remove the pound symbol in front of this link this will uncomment the rewrite module.


Step 2. Restart all services.
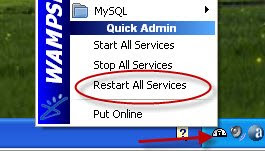
Left Click the WAMP services in the status bar. Choose Restart services.

Managing Wamp Services

Now that you have the WAMP server installed you can manage the services through the task bar icon. Left Click WAMP services icon in the status bar, to bring up the start and stop services tool.


This will also allow you to navigate to the configuration files which we will edit next, to allow permalinks, and external users to gain access to the server.

Import WordPress database

Importing Database

The next step is to import the Word Press database into your current production MySQL database server.

First Copy your word press database dump file into your "c:\wamp\bin\mysql\mysql5.0.51b\bin" if you did not choose the default install directory you will substiute "c:\wamp" for the directory you choose.

Next start a command line tool and navigate to "c:\wamp\bin\mysql\mysql5.0.51b\bin". To start the command line interface choose Start > Run and the type "cmd".
To move to the MySQL bin directory type "cd c:\wamp\bin\mysql\mysql5.0.51b\bin".
Finally run the import tool using the MySQL dump file provided to you.
"mysql -u root < your_database_dump_File.sql"

Moving Wordpress from Test to Prod Server

Moving your Word Press application from your test hosted server to your local WAMP server.

Move the word press root directory from your test server to your production server. You will move all of the files on the server. If you used the default WAMP install then you will move these files to "c:\wamp\www".

After you receive your MySQL dump file, you will open it and edit two items before loading it into the database. In the wp_options table inserts section you will find a siteurl insert and a home insert. Both of these records will point to your test server name and should be changed at this time to your production server name. The simplest way to do this is with a mass replace. "Ctrl+R" Test Server name to Production Server Name.

At this point in time you will be ready to import you Word Press database into the production database server.

Install WAMP and MySql Administrator

Now that we have downloaded the WAMP software and the MySQL GUI tools, we can continue with the install.

We'll start with installing the MySQL Gui Tools.

Step 1. Install MySQL GUI Tools.
Run the installer.
Accept the license agreement.
Choose the path where you want the MySQL GUI tools installed, Choose default.
Choose the complete install.
Review settings and choose next.
Finally Choose the finish button.

Step 2. Install WAMP Windows, Apache, MySQL, Php
Run the installer.
Accept the license agreement.
Choose the path where you want the WAMP applications installed.
Choose to launch the create quick launch icon, and desktop icon.
Review Install details and choose next.
Pick the default web browser for your system.
Choose the location for your smtp mail server and the email address that emails will come from. You do not need to set this at this time you can configure this later in your php.ini. If you know this information you can set it now.
Choose Launch WAMP Server and Finish.

You now have the WAMP Server and Gui MySQL tools installed.

Watch the video below to see install.


Your final step should be to create an install instructions file which include any custom configurations that you took during install. This will help future administrators manage the system.

In this case your instructions file should include the smtp mail server and email address if you entered one.

This completes task 1 and 5 in our task list. Now we will move onto task 2.
Friday, September 26, 2008

Product Gathering for WAMP

Before we can get started we will need to download both WAMP and MYSQL Administrator. Although we do not need the MySQL Administrator we will get it for its easy to use interface.

The very first thing I need is a windows server to install the application on for this project I used a windows 2003 server.

I started this by doing a quick Google search I found WAMP Server Site immediately. The current version is 2.0c and includes the list below. Beyond the items they list are also mysqllite and phpmyadmin both decent management support tools. If you found the site and it was not in English a small English flag is on the right hand nav bar.

WampServer 2.0c [05/05/2008]
Includes :
- Apache 2.2.8
- MySQL 5.0.51b
- PHP 5.2.6

I then did a search for MySQL admin which resulted in me finding the MySQL GUI tools page. This tool set is currently at 5.0 release 12. After I found the site I logged in and downloaded the product. If you do not have an account you will need to create an account with a valid email address and log in. there is no charge for this account its just a registration.

Task List and objective

Objective: in this training exercise is to take a word press application created on a hosting service and move it into a companies local servers. After bringing the WAMP application online and verifying that it is working properly I will secure the area for production.

I will be using WAMP initially to complete this task. I have choose WAMP for its easy of install and time to delivery, I have also consider the level of the administrator in making this decision since it may not be a senior person managing the application server and database in the future. this has moved me to start this on windows based on the simple graphical interface.

Tasks
1. Install WAMP.
2. Move word press files into home directory.
3. Reconfigure server name in database dump file.
3. Recover word press database.
4. Configure application server to support outside access and permalinks.
5. Install MySQL admin GUI tool.
6. Change root database passwords, database application password, application passwords and finally configuration files.
7. Create full back up of database stored on a shared drive.
8. Create scheduled back up of data directory and configuration directory on a shared drive.
9. Verify application

Notes:
At this time I will not go into securing up the Apache server, MySQL database or the word press application, although all of these items will be considered for future projects. I will however make sure all default or known passwords are changed.

First Post

I don't want to get behind on this because I need to move forward on other projects, so I am going to attempt to have my instructions complete by tomorrow. I will do a minimum post today to make sure I get this blog rolling but I intend to have the entire blog completed sometime this weekend. I will shoot to have the whole blog on installing a word press application on a new windows wamp server, coming from a hosted service. I know that by the end of this weekend I will start working on a LAMP project to port the production instance to.

I believe I will continue to grow this blog more specifically on WAMP rather then on word press in the future but for this weekend I will complete posts on installing WAMP, additional tools, base security, installing word press, configuring word press, importing data from and existing word press, changing word press root domain, configuring web server for permalinks, allowing external machines into the word press application and changing the word press database and admin password.